Difference between revisions of "Indexing Workspace"
BenHolland (Talk | contribs) (→Step 2) Select Projects to Index) |
BenHolland (Talk | contribs) |
||
| Line 8: | Line 8: | ||
Alternatively you could create a new Java project by navigating to <code>File</code> > <code>New</code> > <code>Java Project</code> and creating a new Java project. If you create a new Java project, you will want to add some Java code so you have something to index and analyze. | Alternatively you could create a new Java project by navigating to <code>File</code> > <code>New</code> > <code>Java Project</code> and creating a new Java project. If you create a new Java project, you will want to add some Java code so you have something to index and analyze. | ||
| − | == Step 2) Select Projects to Index == | + | == Step 2) Set Indexing Preferences == |
| + | If you haven't already check your [[Atlas Preferences#Indexing_Preferences|Indexing Preferences]]. For this tutorial let's use the <code>Index only used classes in jars</code> indexing option. | ||
| + | |||
| + | == Step 3) Select Projects to Index == | ||
Atlas will index any open projects in the Eclipse workspace that you have selected for indexing. To select and deselect projects for indexing navigate to <code>Atlas</code> > <code>Manage Project Settings</code>. The '''Do no index''' pane on the left lists projects that will not be indexed, and the '''Index''' pane on the right lists projects you wish to have indexed. Be mindful of your analysis task and include any necessary dependent projects and exclude projects you don't need or projects that should not be analyzed (ex: projects with analysis utilities you will use during your analysis). | Atlas will index any open projects in the Eclipse workspace that you have selected for indexing. To select and deselect projects for indexing navigate to <code>Atlas</code> > <code>Manage Project Settings</code>. The '''Do no index''' pane on the left lists projects that will not be indexed, and the '''Index''' pane on the right lists projects you wish to have indexed. Be mindful of your analysis task and include any necessary dependent projects and exclude projects you don't need or projects that should not be analyzed (ex: projects with analysis utilities you will use during your analysis). | ||
| Line 15: | Line 18: | ||
[[File:ProjectIndexSettings.png]] | [[File:ProjectIndexSettings.png]] | ||
| − | |||
| − | |||
| − | |||
== Step 4) Run Indexer == | == Step 4) Run Indexer == | ||
Revision as of 12:56, 30 January 2015
It's time to create our first program graph!
For this tutorial series we have created a few simple projects to get you started learning Atlas.
Contents
Step 1) Create/Import Projects to Index
Import an Eclipse Java project into the workspace by navigating to File > Import > General > Existing Projects into Workspace and browsing to an existing project (ie the HelloWorld project you just downloaded). If the project is a zip archive, you will want to check the Select archive file radio button, otherwise check the Select root directory radio button.
Alternatively you could create a new Java project by navigating to File > New > Java Project and creating a new Java project. If you create a new Java project, you will want to add some Java code so you have something to index and analyze.
Step 2) Set Indexing Preferences
If you haven't already check your Indexing Preferences. For this tutorial let's use the Index only used classes in jars indexing option.
Step 3) Select Projects to Index
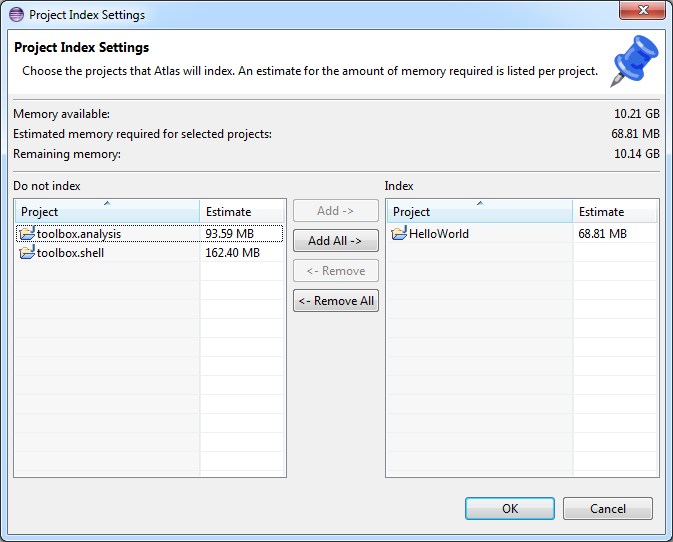
Atlas will index any open projects in the Eclipse workspace that you have selected for indexing. To select and deselect projects for indexing navigate to Atlas > Manage Project Settings. The Do no index pane on the left lists projects that will not be indexed, and the Index pane on the right lists projects you wish to have indexed. Be mindful of your analysis task and include any necessary dependent projects and exclude projects you don't need or projects that should not be analyzed (ex: projects with analysis utilities you will use during your analysis).
In this tutorial, make sure the HelloWorld project is selected for indexing. The screenshot below shows that some additional projects (the toolbox.analysis and toolbox.shell projects) will not be indexed, but the HelloWorld project will be indexed. Note that Atlas conveniently provides a memory estimate for the projects you are about to index. If you need adjust your Eclipse Memory Settings to accommodate the size of the index (program graph), then you should do so now.
Step 4) Run Indexer
TODO
Step 5) Perform Analysis
TODO
